
Confessions Of A Digital Photographer
Sometimes I think I read too much about photography. I’ll visit some technique blogs, learn a different approach to working with specific camera gear, and try it for a while. Then I’ll read something else and off I am to switching to another style. After a while of this, I found that I really wasn’t getting very far toward developing a personal style which would work best for me. I also found that I truly wasn’t understanding the specific camera setting changes as they related to the type of work I shoot. Lately, I had settled for going with semi-automatic (aperture/shutter priority) mode and adjusting my ISO higher as needed. I convinced myself that I was too absorbed by the emotion of the scene I was shooting to check my settings. Out of laziness, I often “carpet bombed” a scene by taking a lot of shots from a lot of angles in the vague hope that one might rise to the top of the rejects. After all, this was the digital age and I could just delete the ones I didn’t want (although I rarely delete anything anymore). I could just fix the shot in Lightroom or Photoshop, right?
Then, while on a recent trip to Jackson Hole to shoot wild life, I contracted the services of professional wild life photographer Scott McKinley. The the original purpose of this was to have Scott take Jayne and me to the best locations to shoot wild life. I really didn’t know much about shooting animals so I thought it would be a great opportunity to be led by a professional guide.
Scott didn’t disappoint us. In fact, he gave me a gift more valuable than I had received in a long time: twelve hours of one-on-one instruction!
The first thing he did was review my camera settings and technique. He quickly explained to me that by using semi-automatic mode, I was allowing the camera to decide the correct exposure for me which often defeated what the specific scene really needed. He switched me to full manual mode. I actually had been shooting in manual mode several years ago, but because I didn’t fully understand why this was better, I didn’t stick with it.
Scott also had me reconfigure my camera for aperture and shutter to shoot in half-stops rather than in one-third increments, and my ISO set from one-third increments to a full stop. His philosophy was that it was simpler and easier to control by using the quick control dial and the main dial. After all, the camera is just a tool. Why this “clicked” (pun intended!) with me was because I remember my old Minolta 102 film camera from the 1970’s and how easy it was to control the technical details of a scene. Today’s cameras are great for all the versatility they provide, but having too many choices is not always a good thing.
The other thing I was hung up on was aperture in relation to depth of field. I thought if I always shot between f11 and f16 with my Canon 1D Mark3 that I would always have the best depth of field I would ever want. Scott explained to me that it was more important for me to shoot in ISO 100 or 200, except when shooting high action. Although my camera does a great job at reducing noise at higher ISO’s, it often does so at the price of image clarity. That is one of the major reasons why my images have always been soft around the edges! This revelation was worth the price of admission!.
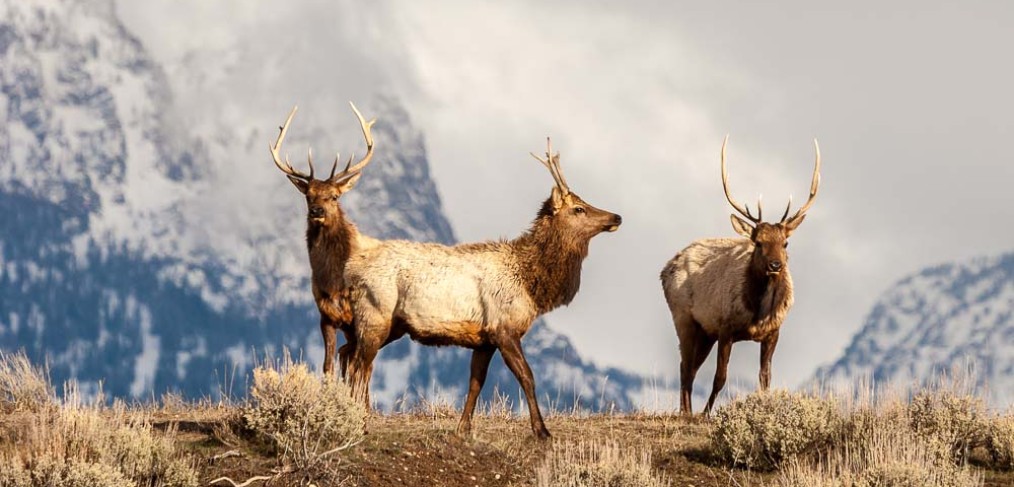
He also said that I need not be so overly concerned about shooting at a wider aperture. He explained to me that as long as the specific object did not fill the view finder and that my lens focus setting approached infinity, the shot would still be razor sharp. I didn’t really believe him till I made some shots and saw the difference! The image below is an example of “getting it right” in the camera. I have not done any editing in Lightroom or Photoshop. It was shot at ISO 100 at 200mm 1/750 f5.6:

Other things Scott taught me that changed my approach was to first take a meter reading of a scene before I potentially might start shooting animals because then my camera would be better prepared to shoot quickly with only a minor adjustment to aperture or shutter. He prefers spot metering because then you can take an initial reading of a specific image element and then make a better guess at the final setting, based on the anticipated final scene. Also, he taught me it was better to take the quick “insurance shot” so that I caught the animal the first time before it moves, and then re-adjust and continue shooting to fine tune the shot.
Scott suggested that I need to slow down and try and study the scene in the view finder first to determine the correct setting for the subject. But I had to do this in compromise for the brightest element in the scene. When shooting animals against a snow-covered mountain, it is easy to fool the camera meter and blow out the highlights of the maintain. By bracketing the scene, one stop up and one stop below, I would be in better shape to make the correct exposure in-camera the first time, rather than just relying on Lightroom or Photoshop to completely correct for this later, potentially at the expense of image sharpness.
I had always wished privately that I had my own personal instructor with me to help me someday to help improve my images. Scott delivered this for me. Sometimes, you are ready to actually “hear” and finally come to understand what you are learning. I was certainly in the right place with the right person to have this happen. Thanks Scott! Please visit his site here.
You can visit the rest of my images here.
Enjoy!
… [Trackback]
[…] Read More: jerrygrassophotos.com/2013/05/confessions-of-a-digital-photographer/ […]
Sorry. I am just not knowledgeable enough in that regard. Good luck.
Thanks for the compliment!
Thanks for leaving a comment, Troy! I did not know that you did the same thing! I highly recommend doing this for anyone wanting to take their work to the next level.
I’m glad you learned so much on your recent trip!
Hiring a local photographer is always worth the price of admission. I’ve done this twice myself: Yellowstone (2009) and Glacier (2011). I owned my SLR for less than 3 weeks when I took the Yellowstone photo tour, but I learned some good high-level concepts. The Glacier tour was just the guide and two of us with cameras, so it was a lot more detailed. That guide taught me to use 1/2 stops instead of thirds, because it’s faster & easier to calculate. He also taught me to use Manual mode instead of my usual Av. So it definitely sounds like there are some similarities between what I was taught and what you were!
And when I’m shooting landscapes, I always set it to ISO 100 (my camera can’t go to ISO 50, which is what my Glacier photographer uses on his 5D). It helps keep the images nice & clean.
Thanks for sharing! I always enjoy your articles. 🙂
-Troy