
Product Photography
In an attempt to further explore the boundaries of my comfort zone, I recently took on a Product photography project. Pushing those boundaries has been for me a great way to learn new techniques and explore new creative potentials. My friend’s tool and die shop, National die, is redoing their website. They asked me if I would be interested in shooting some of their products for use on the remodeled site. National Die was the subject of one of my artistic projects, National Die: Made In The USA. You can view it here.
I had always wanted to try my hand at this type of photography. Learning a new skill may have advantages down the road and could lead to future creative sparks.
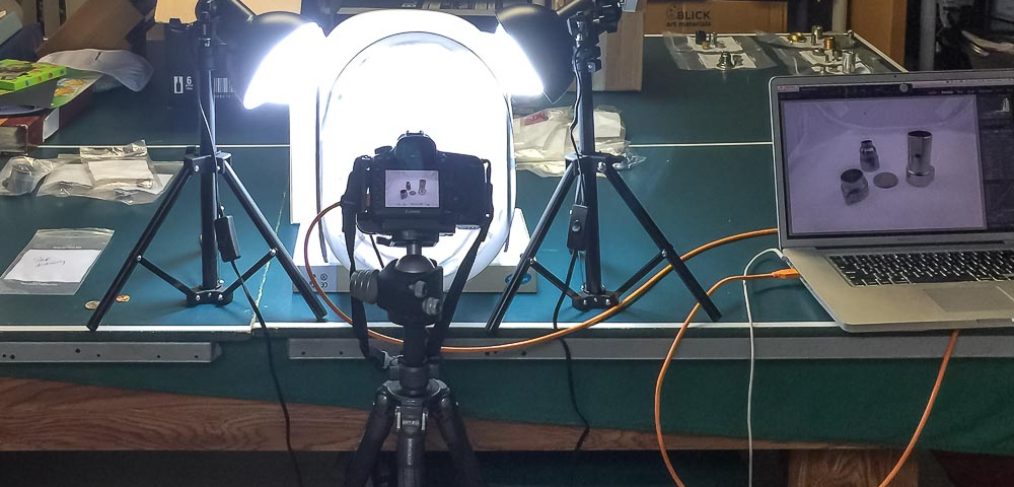
In oder to do this job right, I purchased the Canon TS-E 24mm f/3.5L II Tilt-Shift Lens for use on my Canon 5Ds. I also bought the LimoStudio Photography Studio 12″ and 30″ Photo Studio Tent Light Backdrop Kit in a Box Cube Table Top Lighting Set.
I couldn’t have asked for a better opportunity! Not only did I get to learn the basics of Product photography, but I also expanded my Photoshop knowledge.
In reality, shooting of the various tool and die products sounded easier than it actually was. It took me almost a week to explore the intricacies of using a tilt shift lens. Then there was the experimentation with the light cube sizes and its colored background matts. Finally, I had to decide on the best product arrangement that would showcase the product set in a creative fashion, other than a straight lineup.
I used a tripod and tethered my Canon 5Ds directly to my Mac Pro laptop, using Lightroom. This allowed me to use Live View to see each image directly, as soon as it was shot. This way I could be sure of the result I wanted to capture.
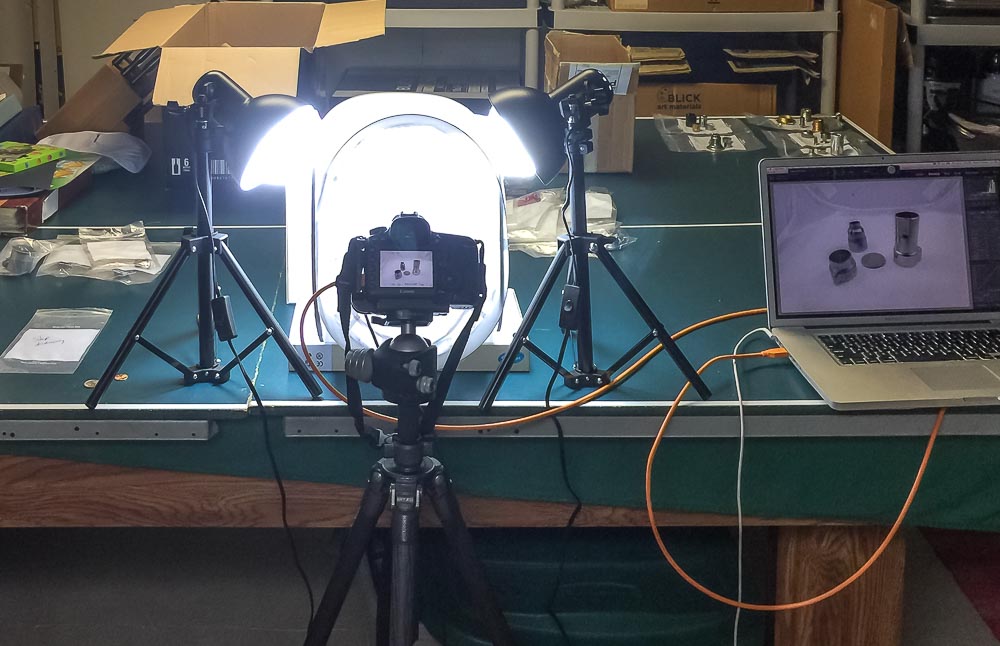
I set my camera to mirror lockup with a two second lag till shutter release, using a cable release just to be sure there would be no shake. I set my camera to manual mode as I typically do anyway, using ISO 100, f/16 at whatever shutter speed was needed. In the end, Using Live View, I took a series of image focus shots, starting from the back-most product and worked my way toward the front. Clarity, sharpness, and edge support were critical. To accomplish this, I would dial in my focus point. I used only the tilt adjustment of the lens to achieve the best clarity for the range of the stack. I tried a 50mm 1.4 and a 28-300mm to see if these lenses offered my any help. They didn’t. The tilt shift was the best, but I still had to use sometimes as many as a dozen focused images (and sometimes more!) as part of the product image focus stack.
The application Helicon Focus was used to blend the focus stack into its final result. Sometimes I had to rearrange the focus stack sequence or try one of the three blending methods the application offered in order to get the result I wanted.
Then, it was back to Lightroom CC 2017. to touchup the imported Helicon Focus image and make some tonality adjustments. From there, I took the image into Photoshop CC 2017. Sometimes I used extra cloning, dodging, blurring of product surface imperfections without overdoing it so as no to give the product a “fake” look. Realism was the goal. At times I used Filter/Sharpen Edges, or Smart Sharpen. Filter/Shake Reduction can be a real magic wan to help improve edge integrity. But be careful: this tool is very powerful and can easily produce a pixelated, high artifact result. Finally, back to Lightroom for some tonal adjustments and sharpening.
The next challenge was selecting the proper image sizing for export as a jpg file. These images were going to be used in a smaller size for presentation on a web page, so I wasn’t too concerned about some remaining product blemishes, but the final exported image must retain its edge sharpness. I ended up using 1000 pixels on the long side, RGB, and maximum output sharpening for the screen at 80% quality. Trying to find the balance between all of these settings in order to keep the file size around 100 kb while maintaining image clarity and edge strength was no easy chore. It took a lot of experimentation to find the setting with which I was satisfied. I then sent these exported images to the customer for sign-off before the final creative look and phase could begin. Sometimes I had to reshoot the product arrangement in order to better show off the craftsmanship of a particular product in the set.
Once signed-off on the product set arrangement and capture, I then began the final phase of the creative look.
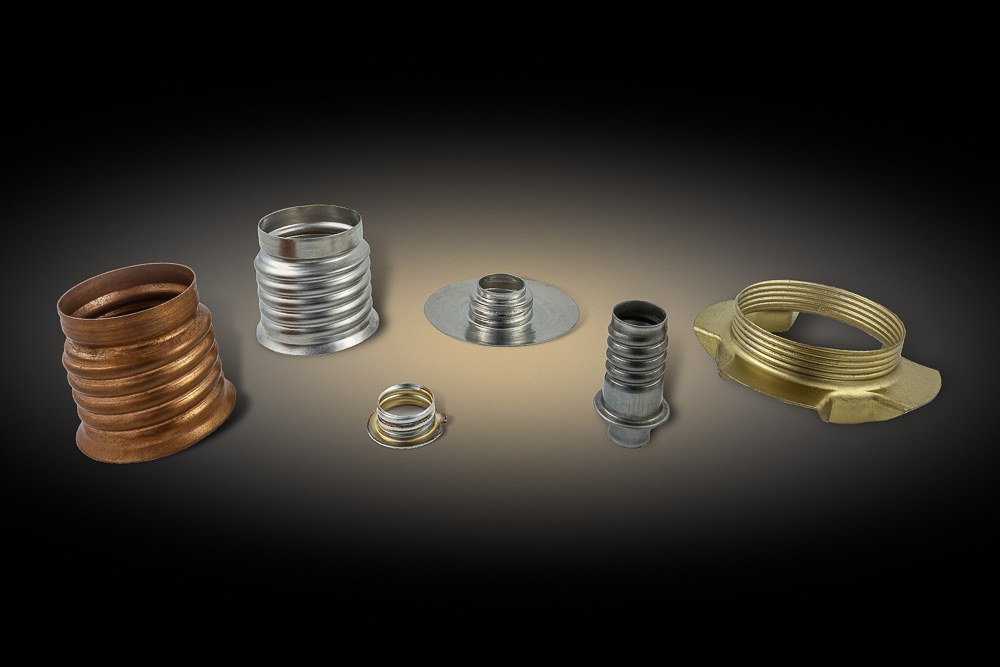
I created a basic, three layer template file for use across all of the product sets. The first layer was a horizontal black background layer. In the next layer, I created an elliptical white spotlight effect in the following way:
- Add a new blank layer.
- Select the brush tool with white as foreground and a soft brush.
- Use angle brackets to increase the size of brush as needed.
- Click the brush circle in center of blank layer.
- Use the transform tool to control the shape and final size.
I then created a third layer using the same technique as above but added a slight yellow tint to the shape and transformed this into an ellipse smaller than the first eclipse below this layer.
The two eclipse layers were then grouped together to ease resizing later as needed, based on the size of the product set.
Next, I imported a product set from Lightroom. The final look I wanted was to have the product set highlighted by the template spotlights. In order to keep a sense of reality to the product look, I needed to create drop shadows for each of the products in the product set.
To accomplish this, I used my medium-sized, Wacom Intuos Pro tablet and Photoshop’s Magnetic Lasso tool to cut out each product in the set to its own layer. Selecting the complete edge of each product was a tedious challenge. Be sure to allow the Magnetic Lasso tool to add its drop points slowly so as to ensure the correct edge is selected. I found that a 50% view was the best compromise in my situation to allow the best selection to be created. You may need to experiment at different viewing sizes to find what will best work for you and you project. Once I made the basic selection using Feather 1, Width 1, Contrast 50, Frequency 57, I tweaked back and forth on several of the Select And Mask settings, using Smart Radius, Smoothing, Feathering, and Shift Edge. Before clicking OK I had to be sure to return the Feathering to 0px so as not to soften the final edges.
Once I had the final product selection created on its own transparent background, I then added a blank layer below this one and filled it with black. This allowed me to closely examine the edges of the extracted product. Inevitably, there may have been some haloing included. This can be easily fixed by using the Erasure tool. Setting the view to around 300% allows the erasing of these halos or of any other edge repair using the Cloning tool, for example.
With each product selection on its own layer, I dragged and dropped each onto the template to create the complete product set and arrangement. I then grouped all of the product layers to create a unified and easy way to transform and scale the entire final arrangement.
To create the individual product drop shadows, I used the following techniques.
- Select the product object on its own layer.
- Make a dupe of this layer.
- Make the original product layer active.
- Cmd T to activate the Transform Tool, grab the top middle edge pull-down, hold cmd as you drag and reposition the product copy to the shape of the desired shadow, taking into account the direction of the light you want to have in the final look.
- On the active layer, right of the layer lock symbol, click on “lock transparent pixels”.
- Open the gradient tool, select the third gradient type from left (black to white grad), linear grad highlighted.
- Drag on the document surface past the top of product drop shadow selection to produce the gradient effect.
- Click off on “lock transparent pixels”, change the layer blend mode to multiply.
- Blur the product shadow base, if needed: go to Filter/Blur/Gaussian Blur, try a blur amount of 3px.
- Open the rectangular marquee tool and drag a rectangle over the top of product drop shadow selection, if needed.
- Click on Refine Edge, try a feather amount of 100px.
- Go back to Filter/Blur/Gaussian Blur, if still needed, try blur amount of 20px.
- And as needed, reduce the shadow layer opacity to taste.
- Group its product and shadow layer together.
I used this Blue Lightning TV youtube video as my basis for the above shadow techniques.
The final product set look is then fine tuned back in Lightroom with tonality adjustments. I usually wait until all of the product shadowing sets are completed in Photoshop and re-imported back into Lightroom. Then I can use Lightroom’s grid view to ensure that tonality, positioning, and arrangements all have the same balanced, consistent look. You don’t want one group to be darker or more saturated, or more lopsided than another. This ensures a more professional result.
Here’s the finished image.
Enjoy!