
Product Movie Photography
As part of my recent product photography work, my client asked me to produce a machine video which showcases the various processes their shop offers their potential customers. Again, this was something I had never done before. I was up to the challenge to get a taste of what is required. The project was small enough so as not to overwhelm me with elaborate sets or procedures. This was the perfect way to gently be exposed to something new.
Research
- Look at other manufacturing websites for video examples.
- Talk with the client about these and any other sites they may have explored.
- Research the internet/talk with any friends or fellow photographers who work the video side for equipment and technique advice.
- Purchase/borrow any other equipment necessary to get the job done.
- Plan out the video objectives, the machine processes to showcase.
- Discuss with the client and machine operators what is needed to produce the video (clean up workspace, set duration of product run, etc.)
Goals Decided
- Shoot short clips up to a final size of not more than seven seconds for each clip.
- Show a variety of camera movement clips.
- Package several of the clips together such that the compiled sequence looks good in a continuous loop.
- Showcase several of the machining processes which are used to produce the company’s precision output catalogue.
Video Movements Used
Needed to provide variety and interest to the selected machine processes.
- Parallel zooming
- Parallel panning
- Side angle zooming
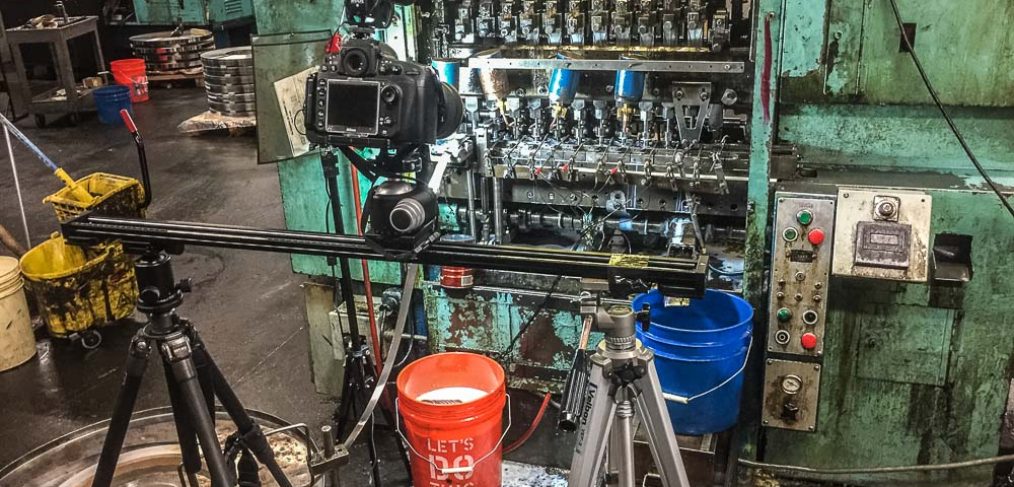
Equipment
- I used my Nikon D800e to record the 1080p 23 fps, shutter set to 1/60, and tried to use an aperture of f11, and auto ISO. The shutter speed is critical to maintain the frames per second rate for the proper movie playback. I also used a cable release for convenience and to further reduce the risk of camera shake.
- I used my Nikkor 70-200mm 2.8 VR lens. I did this because the zooming capability of the lens is very smooth. I originally wanted to use my Nikkor28-300mm VR but the zooming motion felt erratic.
- In order to perform video panning without camera shake or jerky movements, a rail slider is the way to go. I was fortunate to borrow one from a photographer friend of mine. This allows a smooth, controlled panning motion. Push the bullhead and not the camera along the rail while recording so as not to introduce any unwanted camera shakes.
- External, hotshot mounted microphone, like this one from Rode , was used to capture balanced-sounding machine operations.
Lighting
I used one or two lights, as included in this set , on either side of the rail slider to provide adequate lighting of the machine operation. The trick here was not to blow out the highlights and leave enough shadow for realism.
Movie Editing Software
- I used Apple’s Final Cut Pro X .
- Applied a vintage, sepia filter to keep consistent with the product images I delivered earlier.
The Final Result
I submitted to the web services vendor a total of six clips ranging from two seconds to five seconds duration. The composited movie of the six clips was twenty-two seconds long.
Enjoy!